Zenith Aircraft Builders and Flyers
Online Community of Zenith Builders and Flyers
Cleaning up water-troubled aluminium
When my wings kit arrived it sat in my back yard for quite a while before I was ready to get the skins out. During that time we had our one day of rain for the year and much later when I needed the skins I discovered that the water had distressed the metal.
At the time people who saw it said it was just oxidisation and would buff out with the right polish so I carried on and built the wings, which are now ready to mount to the fueslage.
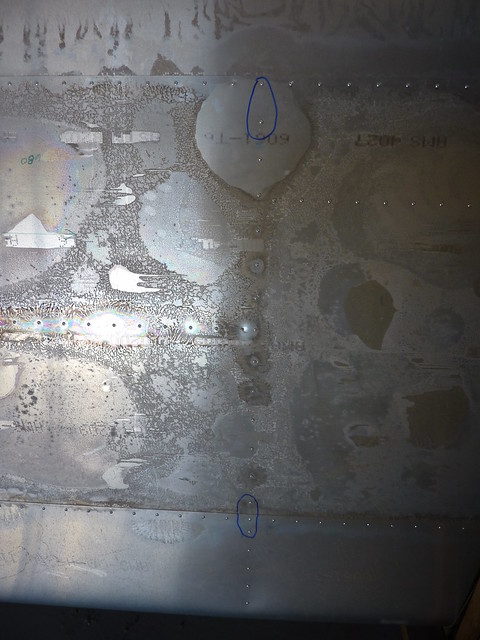
Here's an example of a bottom skin (ignore the circled areas - they are marking the strut fittings location that I had mistakenly riveted)
Since this picture I've been working on it with some F9 NuShine polish. It sure is a lot of work, the dull parts are getting shiny but the "bubble" like pattern is not coming off like I expected. If I run my finger over a shined area though it is totally smooth, even with the oxidisation still showing.
So I'm trying to decide if
- I'll just have to live with the pattern (until I paint/vinyl wrap)
- I keep trying, it will come off eventually
- Another product would do what I want
- Wing skins are beyond repair and I need to remove and install new ones
I know it is hard to tell from the picture but there isn't any actual corrosion, no pits forming and the skins haven't changed their look in the two years since I took them out of the box. So I think they are fit for purpose but I'd really like to get them looking nice.
Anyone got any ideas?
Thanks
Paul
Tags:
Replies to This Discussion
-
Permalink Reply by Joe Harrington on March 16, 2014 at 3:50pm
-
Hi Paul,
Your water corrosion does not look as bad as the condition that I had on some of my aluminum. I am polishing my 750 and have already polished out the corroded pieces. I just looked for some “before” photos but I guess I never snapped any. I was worried at first, but once I figured out a workable method, it did not add much time to the polishing of my airplane. I would estimate that the corrosion cost me 3 or 4 hours on a 150 hour procedure. About 10-15% of the airframe was affected with corrosion like that you show.
The procedure I come up with was to take a new (maroon) scotchbrite pad and cut it to the size of the polishing pad of my polisher. Generously spread F9 polish on the scotchbrite and “go to town”. In some areas I found that I had to make two passes but most areas seemed to be cleaned up in the first pass. I found the the scothbrite pad lasted longer than I first would have thought. I originally used a regular (4-5 inch) random orbit sander with the scothbrite but found that was unnecessary. The 7” polisher was faster and easier, and did just as good of a job.
You can read about my polishing experiences here: http://www.zenith.aero/forum/topics/polishing-your-airplane-tell-us...
BTW, I also found when I polished the corroded areas without first doing the above procedure, that I could always see where the corrosion was; it had “cloudy” spots where the corrosion previously was located.
Good luck,
Joe
-
Permalink Reply by Paul Sanders on March 16, 2014 at 7:19pm
-
Hi Joe,
Thanks for the suggestion, I shall give it a try. The shine on your metal is impressive, even more so if it once looked like my wings.
Paul
-
Permalink Reply by Joe Harrington on March 16, 2014 at 9:32pm
-
Yes there were big spots on the fuselage. The worst spots were just behind the rear window on the left side. I am not sure if I have posted any photos from that side, but both sides are equally shiny.
New from Zenith:
Classified listing for buying or selling your Zenith building or flying related stuff...
Custom Instrument Panels
for your Zenith:
Custom instrument panels are now available directly from Zenith Aircraft Company exclusively for Zenith builders and owners. Pre-cut panel, Dynon and Garmin avionics, and more.
Zenith Homecoming Tee:
Flying On Your Own Wings:
A Complete Guide to Understanding Light Airplane Design, by Chris Heintz
Builder & Pilot Supplies:
Transition training:
Aircraft Spruce & Specialty for all your building and pilot supplies!
How to videos from HomebuiltHELP.com
Developed specifically for Zenith builders (by a builder) these videos on DVD are a great help in building your own kit plane by providing practical hands-on construction information. Visit HomebuiltHelp.com for the latest DVD titles.
© 2026 Created by Zenith.Aero.
Powered by
![]()
Exlusive online community for active builders and pilots of Zenith Aircraft kits (Chris Heintz / Zenair light airplane designs).

